
INK FORMULATION &
COLOR QUALITY
(VERSION 6)
Tutorial, Tips, and Tricks
“Color is a sensation in your mind.” – Michael Gardner
“All colors will agree in the dark.” – Francis Bacon
colorlab
colorlab@inksystems.com
(p) 323-720-4000
(c) 818-836-4544
Ink Formulation & Color Quality (Version 6)
Course Description
This course will go over two different programs that are used in formulating inks, comparing, measuring, and managing color.
This course will teach how to utilize your software and measurement devices, keeping your subjective eyes from making 100% of a color decision. You will also learn how to match colors more efficiently and pick the RIGHT color combination to match under any light source. Lastly this course will teach you how to save all of your data in a practical, “easy to find” system.
Some existing knowledge or experience with color matching could help with understanding this course, yet is not necessary.
Course Goals
Ink technicians that complete this course successfully will be able to:
- Understand how to navigate and connect to these X-Rite programs.
- Understand and communicate L*a*b*s and measurement conditions.
- Correctly and efficiently be able to match a color with unknown color combination.
- Be able to create a library of digital files with all of your color data.
Required Materials
- Color Quality software (version 6), by X-Rite
- Ink Formulation software (version 6), by X-Rite
- X-Rite Exact or SpectroEye Spectrophotometer
Course Overview (The Big Picture)
Our industry is moving more and more toward digital standards and quality control through color measurement. It is important to be able to communicate to a customer everything you need to successfully match one of these digital standards. It is just as important to communicate when you don’t have all of the info you need to make a successful match, for example, measurement conditions, spectral data, etc.
With packaging houses being the main focus and biggest growth of our business it is important to match something correctly. Correctly, meaning using the correct measuring and tolerancing methods to formulate a match that looks the same on a shelf in a department store or on your kitchen counter at home.
Table of Contents
If you are looking at this digitally these are links. Click on any section to jump to it.
1.1.2 More than meets the eye 3
1.2.1 Connecting Spectro and Dongle 5
2.2.1 Preset Display Window 10 – 11
2.4 Creating a Customer 13 – 14
2.6 Creating a Standard 20 – 23
4.1 Colornet® in Ink Formulation 40
4.2 Colornet® in Color Quality 41
- General
1.1 Introduction
X-Rite Color Quality (CQ) is a job based QC/QA program for comparing color. You can save digital standards and multiple sample measurements by customer, job, or standard. (section 2)
X-Rite Ink Formulation (IF) is a program for formulating spot colors. You can easily include or exclude colorants for specific job criteria. (section 3)
1.1.1 Benefits of Color Quality & Ink Formulation
Color Quality (CQ) and Ink Formulation (IF) will help you match a color quicker. You will start a formula with the correct colorants and an ideal strength from the beginning, something that is more of a trial and error process without this software. CQ makes it easy to compare a color and see exactly where your color needs to go to match, e.g. yellower, blueer, dirtier, etc.
As discussed in the Course Overview, optimized color matches are important for the success of a print job. Color Quality (CQ) and Ink Formulation (IF) can give you this “optimized” match by seeing what the eye does not.
1.1.2 More than meets the eye
CQ and IF take into account different light sources and how a color can look under these different lighting conditions. They do this by collecting spectral data from the spectrophotometer and creating a spectral/reflectance curve. With this information, they can compare the target’s vs. sample’s curve. IF can add different illuminants, e.g., D50, A, FL2/CWF, etc. and get a very close idea of how a color will look under various light sources. Your eyes can only see the color for what it is under a single light. A light booth with 3 or 4 different types of light can give you some idea of how a color will react, but there are still so many more types of lighting than just those few.
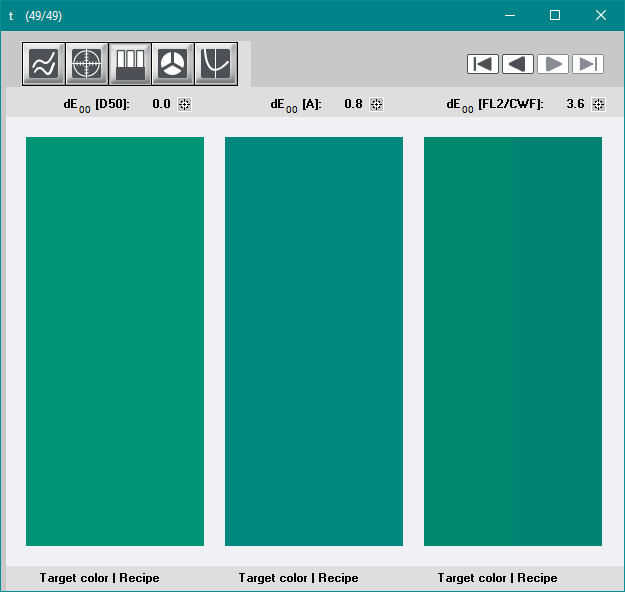

(left – Correct Colorants) The target color and match color look the same under
different light sources.
(right – Wrong Colorants) Although still a 0 dE under a D50 light source, the match
looks very different than the target under an FL2/CWF
(cool white fluorescent) light source.
1.1.3 How does IFS work?
Unlike the Pantone guide, IF is designed to match everything at the same ink film. This will shorten make ready time on press because a pressman will know where to have his keys set to get a close ink film each time. It will also take the trial and error of getting an optimum ink strength in an ink room. Our set of blending inks (which varies in strength compared to Pantone’s) has been programmed into IF and takes into account the specific strengths of these inks, therefore if it tells you to put in some extender into a full-strength Pantone color, you should do it. The Pantone book is printed at all different ink films (see chart below) which makes it very difficult for an operator to find the right key settings. It is also a “dead” way of thinking now that presses get CIP data that controls their starting key position, based on every spot color being the same ink film.

(above) Ink film (g/m2) of colors in the Pantone Guide.

(above) Ink film (g/m2) of colors matched by Ink Formulation.
It is unavoidable that some colors (e.g. Imitation Blues, etc.)
will need more ink because of how dark and clean they are.
1.2 Setup
1.2.1 Connecting eXact and Dongle
Plug your USB cord into the eXact and the other side into the computer. It will ask you where to connect it, choose Windows because CQ and IF are made for Windows only. Next you will make sure that you are in fact connected. (See diagram below).
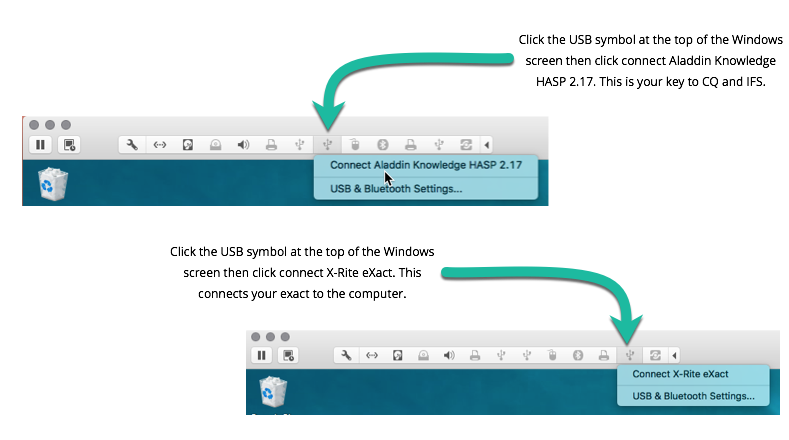
Note: If already connected, the USB symbols will be black rather than a light gray, also when clicked it will say “Disconnect” instead of “Connect”.
1.2.2 Troubleshooting
Many Spectro connectivity problems arise when Windows is not shutdown correctly. When shutting down or restarting Windows it is important to use the Start button at the bottom-left corner of your desktop. Once a proper shutdown is complete then you can close VMware.
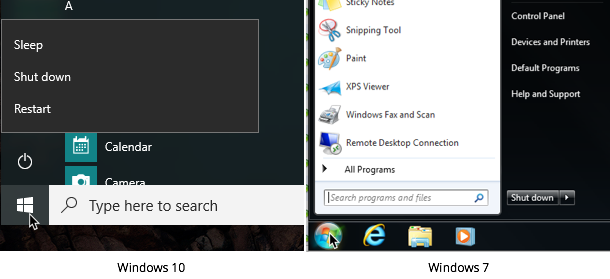
Windows 10 Windows 7
- Color Quality
2.1 Main Window (Icons)


2.2 Setup & Settings
Your settings are an integral part of being successful in using this software. L*a*b* means nothing if you don’t have your settings correct. It is important to not only set your measurement conditions right, but also know what those setting are and how to change them. Setup your program as shown below unless requested otherwise.

General Settings
- Click menu Settings: General.
- Select the following measuring conditions. (right)
- Click OK.

Program Settings
- Click menu Settings: Program.
- Setup the same as the diagram (left).
You want to keep the kL:kC:Kh the same (at 1.00) but you can change the dE* to match your ink room’s tolerance.
- Click OK.
We use dE2000 because it calculates a grade (or dE) that is closest to what our eyes see.
Spectrophotometer Settings


- Click menu Settings: SPM or
- Click Search.
You are not connected if you see question marks instead of the serial number or software version.
- Exit the window by clicking Close.

You can also tell if a your Spectro is connected or disconnected by looking at the SPM icon at the top of your software’s screen (right).
2.2.1 Preset Display Window
Setting up a preset display window makes it easy to see the info and graphs that are important to you and hide the things that are unnecessary. Below are some standard setups for preset windows that show important color information.


To create a display window:
- Click on the Displays icon.

- Choose what displays you want activated.
Activate the same displays as the image to the right to create a display window like the one above on the left.
- Click OK.
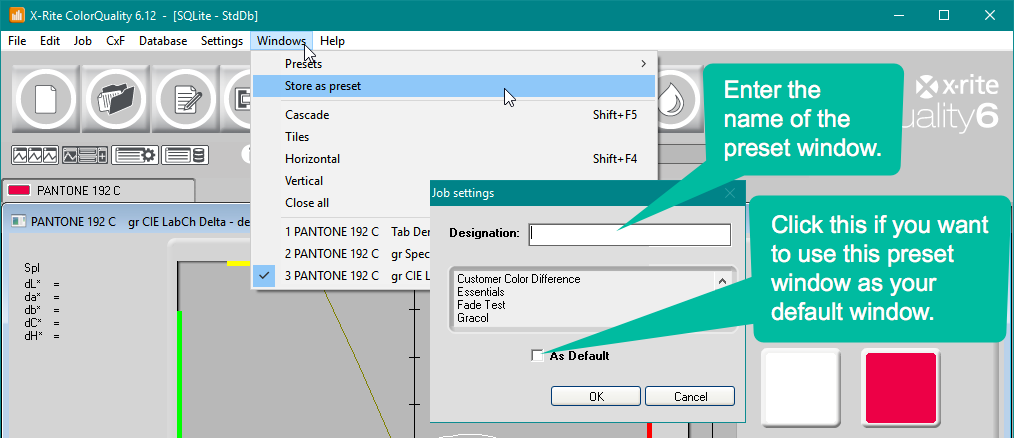
To store a Preset follow the steps below and reference the figure below:
- Set up your window as preferred. (see page 10 for examples)
- Click on Windows at the top of the screen and then Store as preset in the drop down menu.
- Enter the name of your window in the Designation box in the Job Settings window. Check the As Default box to make this your default preset window.
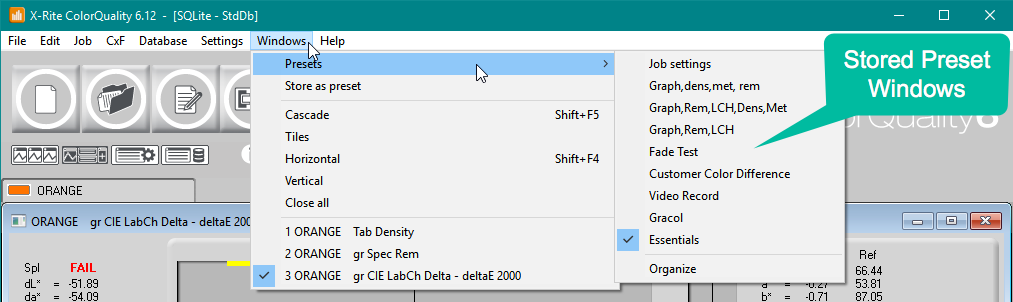
To access your preset windows (see figure below):
- Click on Windows at the top of the screen.
- Hover over Presets in the dropdown menu.
To the right all of your stored presets will appear.
- Click the on one you want to use.
2.3 Quick Compare
Quick Compare is used to compare a reference (e.g. Target Color, Digital Standard, Standard wet sample, etc.) to a sample measurement (e.g. Color match, Batch sample, etc.).
Remember to put enough stock under your measurement to avoid influence from the background.

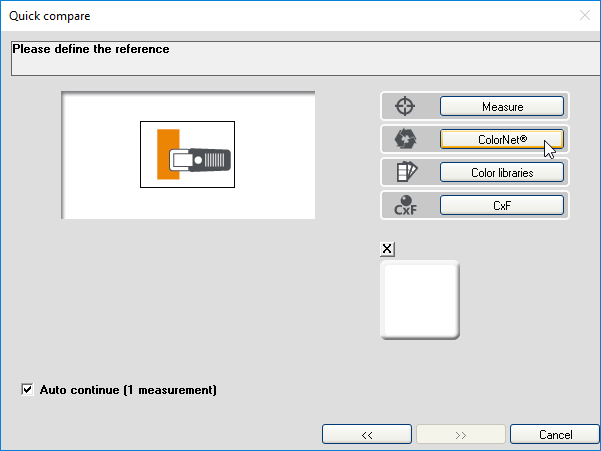
1. Click the Quick Compare icon.
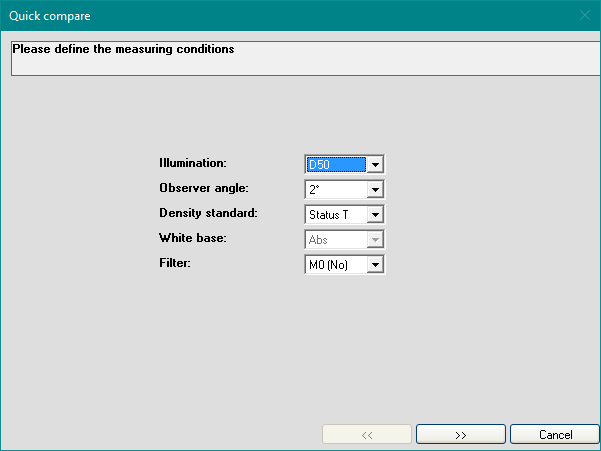
2. Before measuring the reference check the measurement conditions. Select the desired conditions and click OK.
You can change these conditions here and will not affect your default settings defined in General Settings.

3. Define the reference by measuring and click OK.
Your eXact will measure by simply closing the clamshell.
The other reference choices are explained in Creating a Job. (section 2.5)
The program switches to the main window and is ready for measuring samples. “Fire at will.”

To close this mode:
Click on Job > Close (right)
The program asks you whether you want to save the Quick Compare as a job. This gives you the option to save your work as a job within a specific customer folder. We will talk about creating jobs in Section 2.5.
2.4 Creating a Customer
In CQ you can create a folder where you can store all of your work for a specific customer or category (e.g., jobs, standards, formulas). This folder is called a Customer. Saving your work under a customer makes it easy to find and pull up at a later date.
This diagram (below) shows the hierarchy of the folder system in CQ.
Notice the Customers category at the top.
Within the Customer (parent folder) is a Standards folder, where you can store digital standards. Within the Customer is also a Jobs folder, where you can store multiple digital standards used for a particular job and/or batch master measurements.
You can have many colors in your Standards folder and many Jobs (with many colors) in you Jobs folder.
To create a Customer:

- Click menu Database: Customers.

- Click on New.
(right – top window)
- Enter Designation, or the customer’s name. Then click Ok to finish. (right – bottom window)

- Your new customer, along with existing customers show up on this screen. (right)
- Click Close to close this window.
You only need to create a customer once and then you can continue to save files under that customer.
2.5 Creating a Job
A Job in CQ is a way to save all of your Color Reads (Reference and Samples) in an organized fashion. Saving your color comparisons is very important to today’s and the future’s workflow. A job is a way to create a digital standard, or a master target. You can then save every batches color in comparison to your original target. Having a static standard is more accurate than a wet sample that will eventually run out.

- Click the New Job icon.
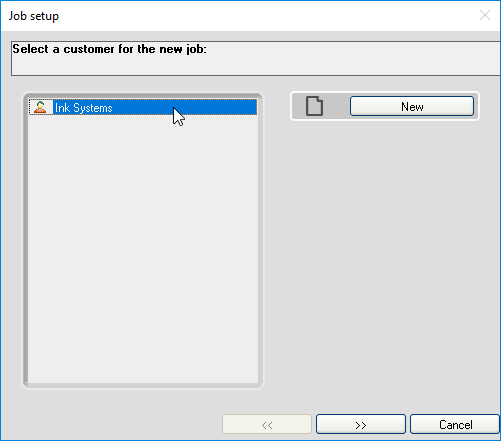
- Select an existing customer for this job and click >>.
Or
Create a new customer by clicking New.

Name the customer, click OK, then choose your new customer.
New customers will be found at the bottom of the list. (see top right picture, Job Setup)
A customer can also be created beforehand by clicking Database > Customers. (see section 2.4)
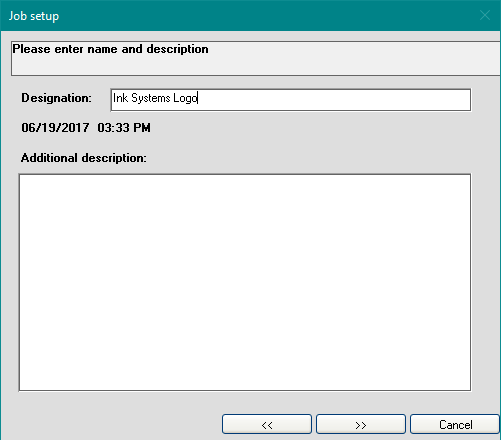
3. Enter job name (Designation) and description.
Click >>

4. The default measuring conditions defined in your general settings are displayed.
You can define any conditions here. They will only be used for this job.
Click Finish
5. Create a reference/target color by clicking New.

Defining your reference by:
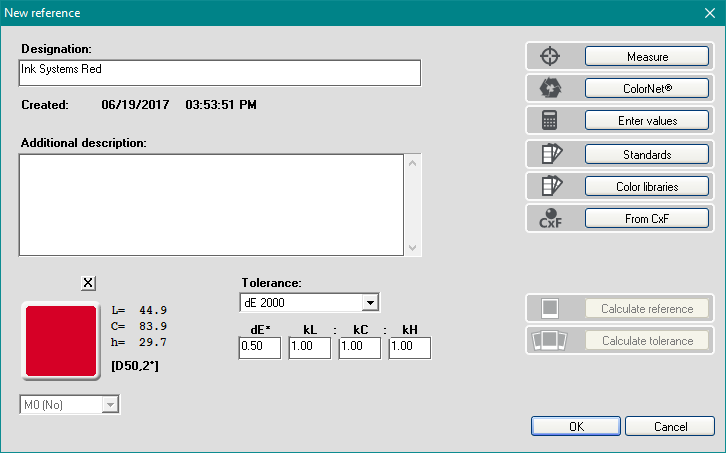
- Measure. Click Measure to initiate measurement, or simply close your eXact’s clamshell.
You can name your color in the Designation field and change tolerancing method on this screen. (right)
Put enough stock under your measurement to avoid influence from the background.

- ColorNet® is the bridge between CQ & IF. Saved colors can be shared between programs via ColorNet. (section 4)
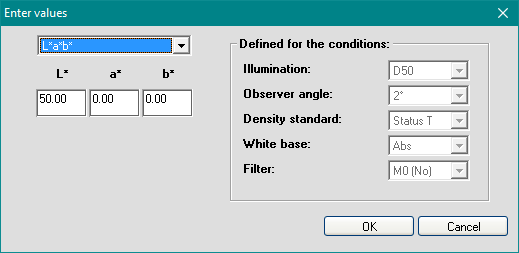
- Enter Values. You can enter an L*a*b* or L*C*h* here.
Measurement conditions need to be known to enter L*a*b* and get correct results. Also, no spectral curve is created when entering these numbers solely.
- Standards explained in section 2.4 Creating a Standard
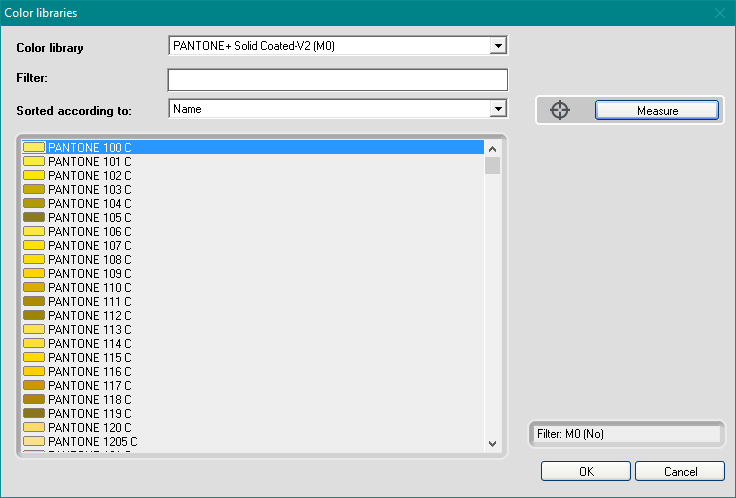
- Color Libraries is where you can find Pantone “Master” Digital Standards.
Pantone plus version 2 is the newest pantone colors you will find here.
- From CXF. Find and select a .cxf file to use as a target.
The button with the 3 dots (right) will open this explorer window you see to the below.
Highlight your file and click Open. (below)
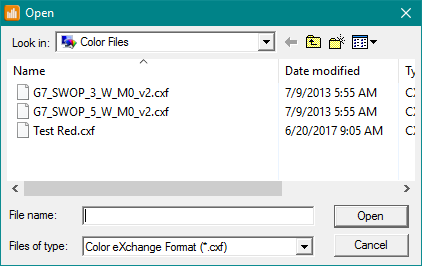
Choose your reference and then click Select. (above)
5. After measuring, choosing, or entering in your reference/target color click OK.
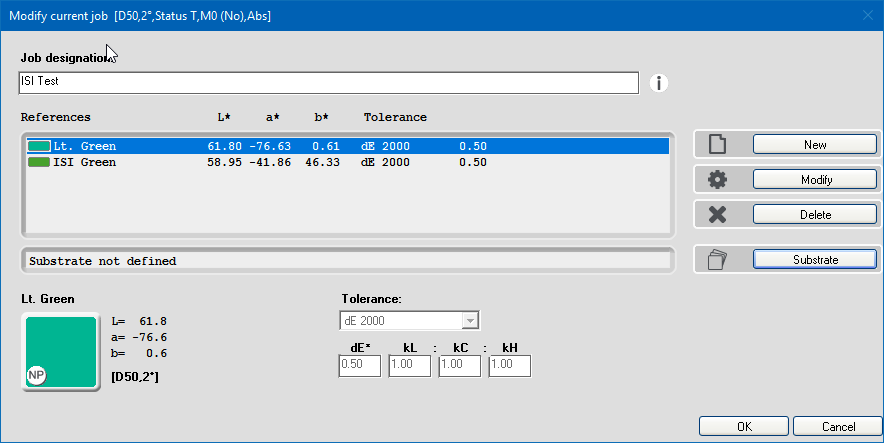
The reference now displays in the job window. (right)
You can add up to 50 references into one job.
6. Click OK to close the window.
The program will automatically switch to the main screen with your job open. You can now measure samples or use digital measurements from ColorNet®. (Section 4)

2.6 Creating a Standard
Creating a Standard in CQ can be useful if you have a color that is used on multiple jobs. For example, Ink Systems Red runs on many different substrates but the target never changes. Therefore, if you assign Ink Systems Red as a Standard you can pull that standard into any job, on any substrate. This would work for a Pantone color too. Pantone 300 Blue is always the same target the only thing that changes is the type of ink, substrate, and coating.

- Click menu Database: Standards.
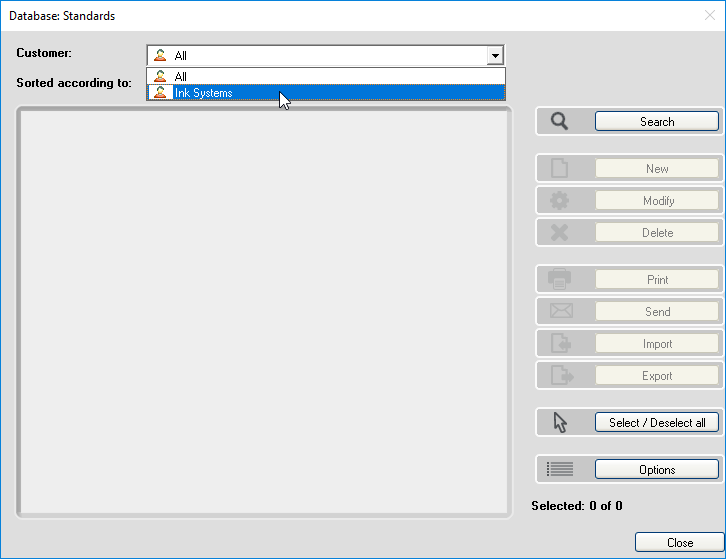
- Choose the customer in which you want to create the standard under.
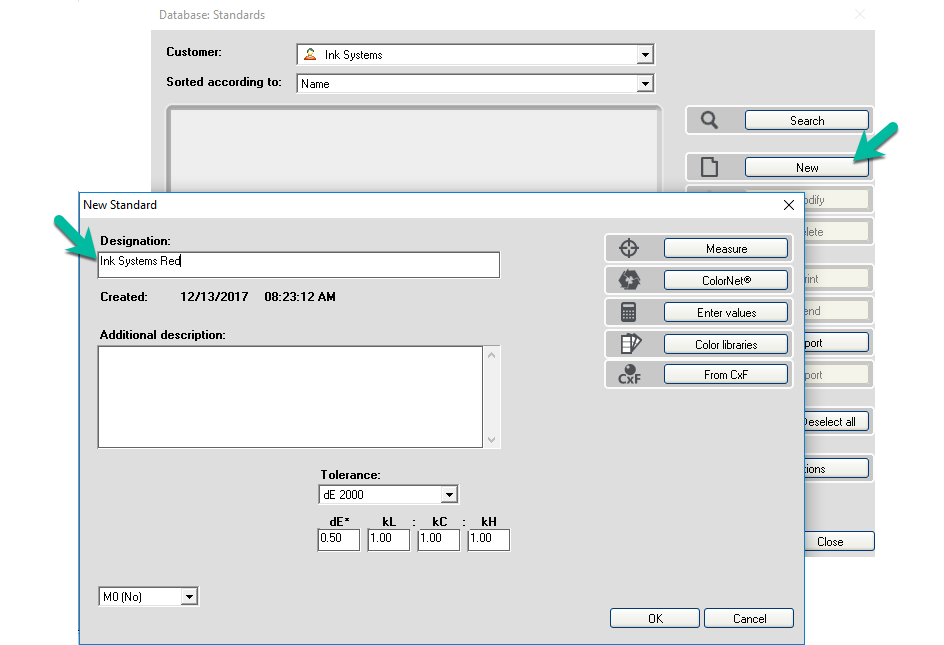
- Click New.

- Enter the standard’s name under Designation.
A digital file from ColorNet®, Color Libraries, or a CxF will already be named.
Certain conditions will be driven by how you define a standard, for example when you choose a color form “Color Libraries” the filter type is set in stone. On the other hand, when measuring you are in control of all settings because essentially you are creating that digital standard as opposed to importing an existing standard.

- Create your Standard by:
- Measure. Close the eXact’s clamshell to initiate measurement, or click Measure.
Put enough stock under your measurement to avoid influence from the background.
- ColorNet® is the bridge between CQ & IF. Saved colors can be shared via ColorNet. (section 4)
- Enter Values. You can enter an L*a*b* or L*C*h* here.
Measurement conditions need to be known to enter L*a*b* and get correct results. Also, no spectral curve is created when entering these numbers solely.
- Color Libraries is where you can find Pantone “Master” Digital Standards.
Note: Pantone plus version 2 is the newest pantone colors you will find here.
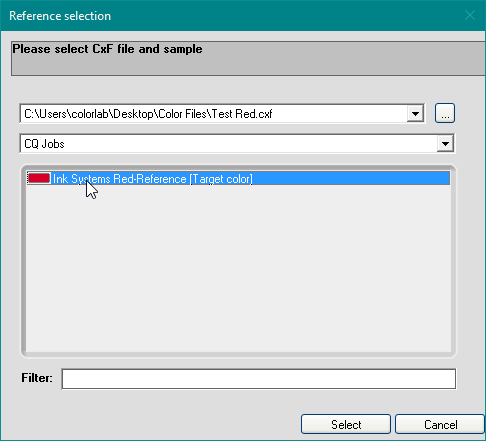
- From CXF. Find and select a .cxf file to use as a target.
The button with the 3 dots (right) will open this explorer window you see on the below.
Highlight your file and click Open. (below)
Choose your reference and then click Select. (left)
- After measuring, choosing, or entering in your reference/target color click OK.

- The standard now displays in the Standards window, under the chosen customer. (right)
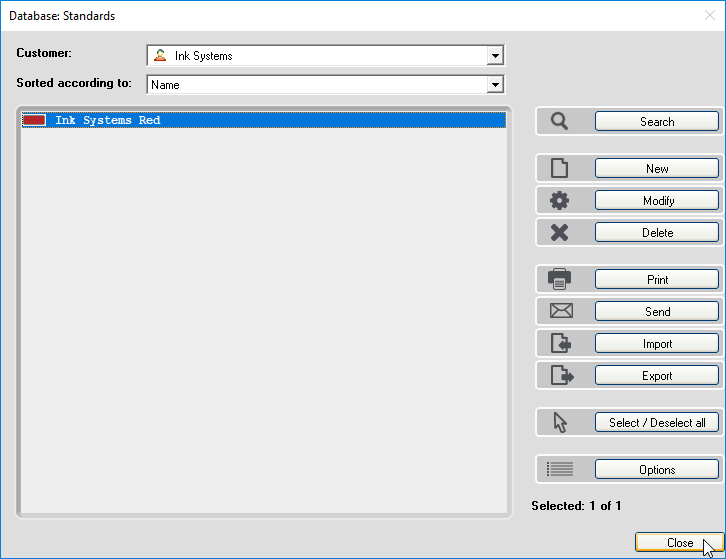
- Click Close.
You now have a digital standard that you can use over and over in a Color Quality job or as a color match in Ink Formulation.
2.7 Accessing a Job
To access a job already created in Color Quality perform the following steps.

- Click on the Open Job icon.

- Choose the customer in the drop down menu.
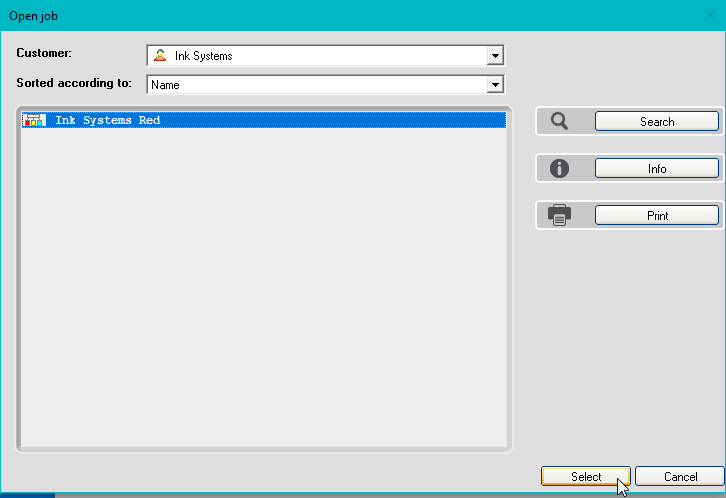
- Highlight the job and click Select, or double click the job.
- Ink Formulation
3.1 Main Window (Icons)


3.2 Setup & Settings
Your settings are an integral part of being successful in using this software. L*a*b* means nothing if you don’t have your settings correct. It is important to not only set your measurement conditions right, but also know what those setting are and how to change them.

In Ink Formulation your measurement conditions are driven by your Assortment (Colorant Set). The conditions are listed in the name of each colorant set. (see right)

General Settings
- Click menu Settings: General.
- Select the following measuring conditions. (right)
- Click OK.
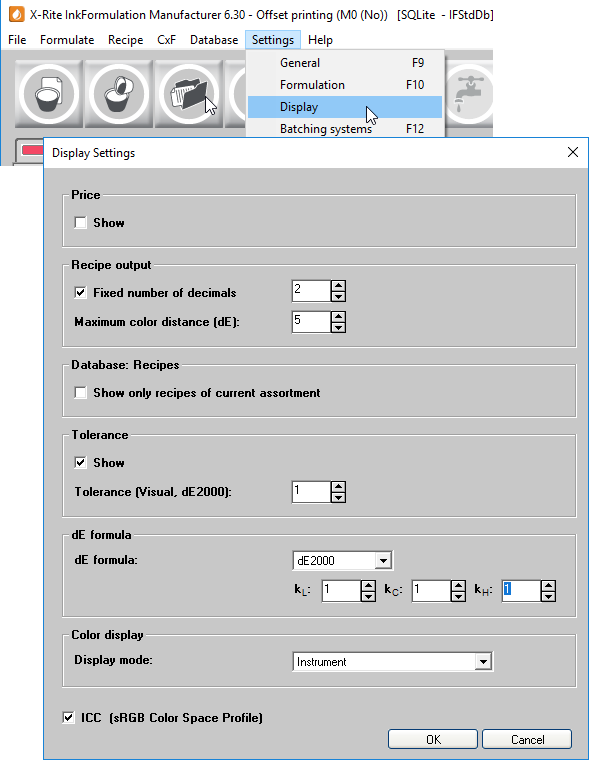
Display Settings
- Click menu Settings: Display.
- Setup the same as the diagram. (left)
The only time you want to change any standard settings is if your customer specifies something other than those conditions.
- Click OK.
We use dE2000 because it calculates a grade (or dE) that is closest to what our eye sees.
Spectrophotometer Settings

- Click menu Settings: SPM or
- Click Search. You are not connected if you see question marks.
- Exit the window by clicking Close.


You can also tell if a your Spectro is connected or disconnected by looking at the SPM icon at the top of your
software’s screen. (right)
3.3 Basic Recipe
The basic recipe function within Ink Formulation will give you a starting formula to a color match based on our colorants shade and strength. When used properly it will help you determine the right colorants to use and ultimately get you to a match quicker than without.

- Click on the arrow to open the Assortments window.
- Highlight the assortment you want to use and then click Select.
An assortment includes the type of ink and the measuring conditions in which they were measured.

- Click on the Formulate->Basic recipe icon.
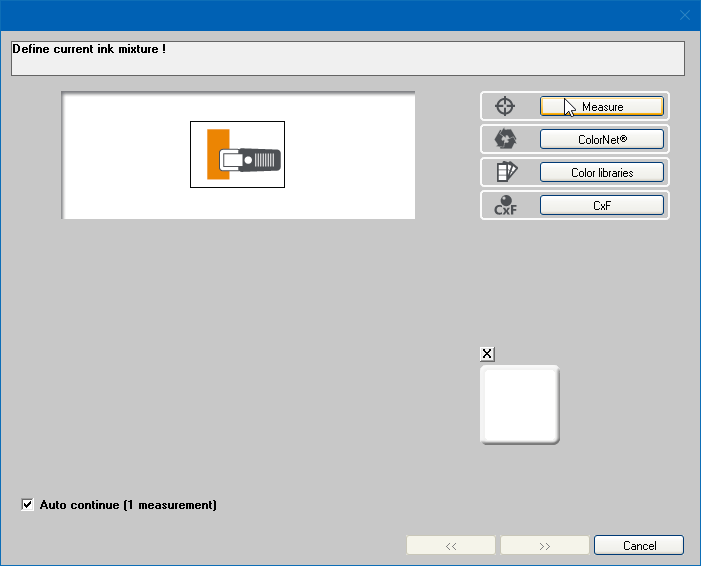
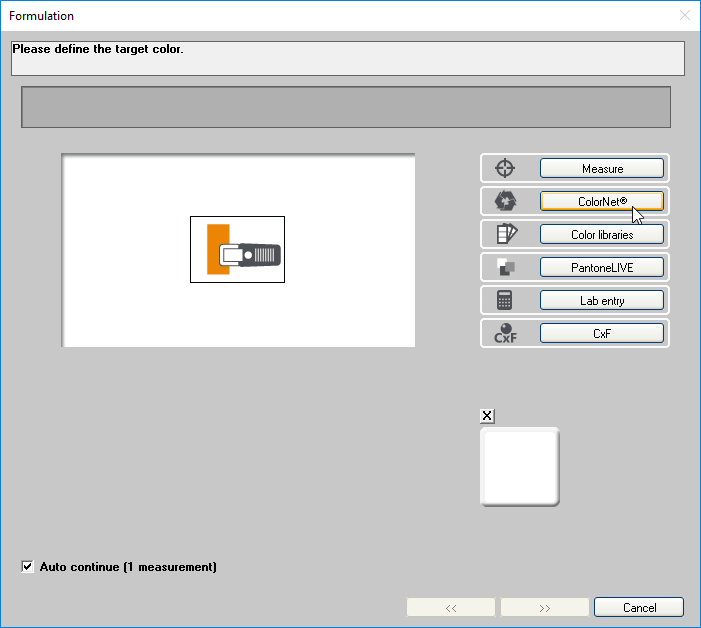
- Define your target by:

- Measure. Close the eXact’s clamshell to initiate measurement, or click Measure.
Put enough stock under your measurement to avoid influence from the background.
- ColorNet® is the bridge between CQ & IF. Saved colors can be shared via ColorNet. (section 4)
- Color Libraries is where you can find Pantone “Master” Digital Standards.
Note: Pantone plus version 2 is the newest pantone colors you will find here.

- Pantone® Live is a cloud based database where you can pull Pantone’s Master and Dependent Digital Standards. (section 3.7)

- Enter Values. You can enter an L*a*b* or L*C*h* here.
Measurement conditions need to be known to enter L*a*b* and get correct results. Also, no spectral curve is created when entering these numbers solely.
- From CXF. Find and select a .cxf file to use as a target
The button with the 3 dots (right) will open this explorer window you see below.
Choose your reference and then click Select. (above)
- Once you have defined your target click Select, OK, or >>.

- Choose Measure substrate in the checkbox.
Then click the >>.

- While hovering the Spectro over your substrate click Measure.
You can also simply close your eXact’s clamshell to initiate the measurement.

- Choose what type of ink you are making by clicking on the down arrow and choosing one of the options in the drop-down menu.
This will add a predetermined amount of additives to your formula. You can leave it blank if you do not want any included.
Then click the >>
- Pick a premade group, or individually move colorants with the single arrows. The Available colorants box (left side) will discard them from this match and leaving them in the Selected colorants (right side) will keep them in as possible colorants for this match. (see below)
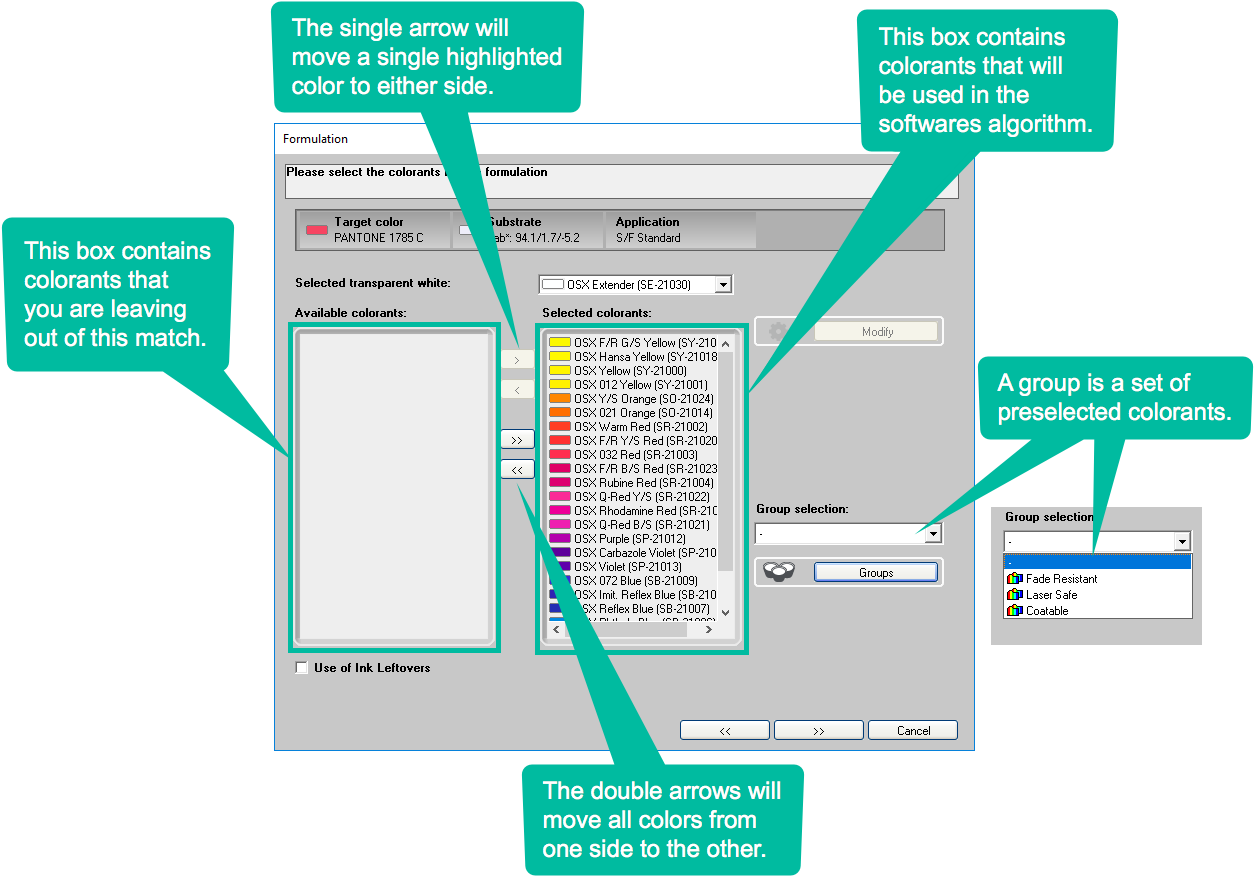

- Click Finish to calculate the formula.
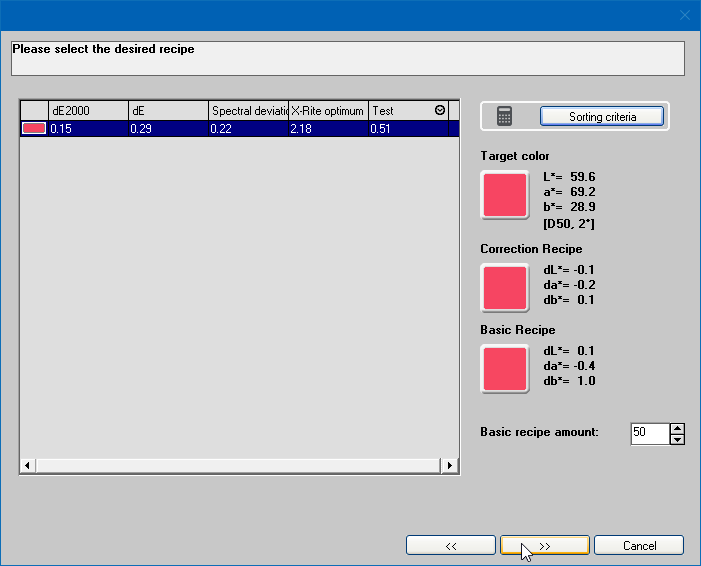
This window (right) shows the programmed sorting criteria. From this screen you can choose a formula to view first..

- Choose your formula.
You can scroll through numerous combinations to find the right one, although in most cases you will find the best match in the first few.
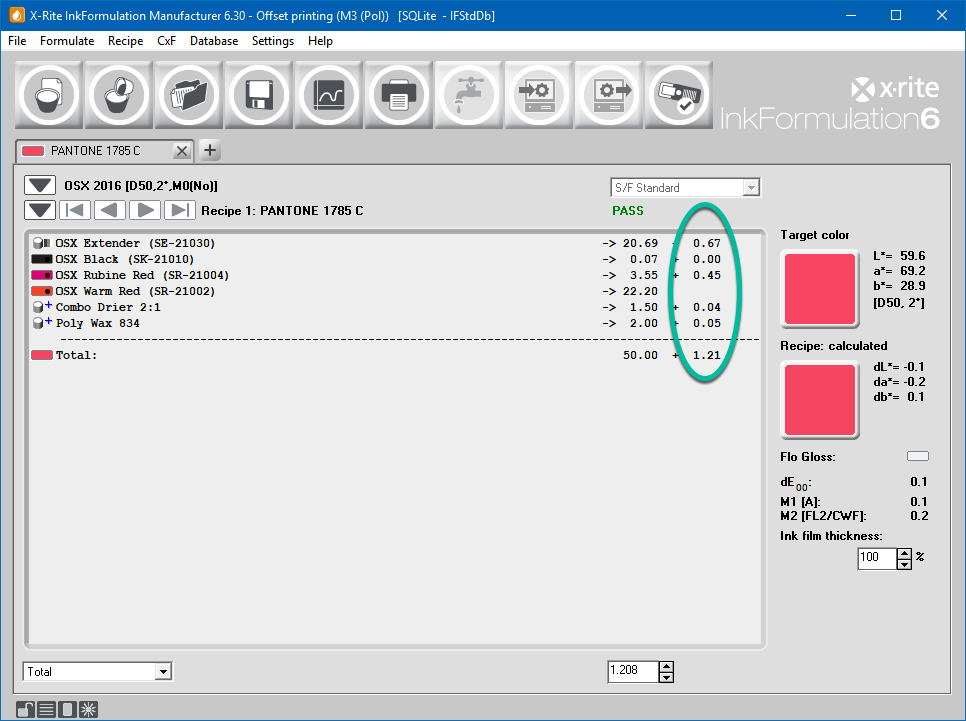
- Change your 100% formula to a sample amount that you prefer, e.g. 50 grams. (see green arrow – right)
You can now weigh and print your sample.
3.4 Spectra
If you get a sample to color match and you don’t know what colorants were used, it is important to look at the Spectral, or Reflectance curves. Spectral curves are made from the raw spectral data of a color. No two curves are alike unless you have a perfect color match, using the exact same pigments and concentrations. By knowing this you now know that you need to compare these spectral curves. If your target color and sample color’s curves don’t match than you do not have a perfect match.
A perfect match is nearly impossible but a nearly perfect match is easy with Ink Formulation. IF has a helpful tool called Spectra (see below), where you can compare these curves. If you don’t find an exact curve match you look for the one that is closest. A general rule of thumb is that you don’t want a match where the curves intersect more than 3 times. Sometimes we are limited due to a job being coated or other factors that rule out using certain pigments, but we must do are best to get as close as possible.
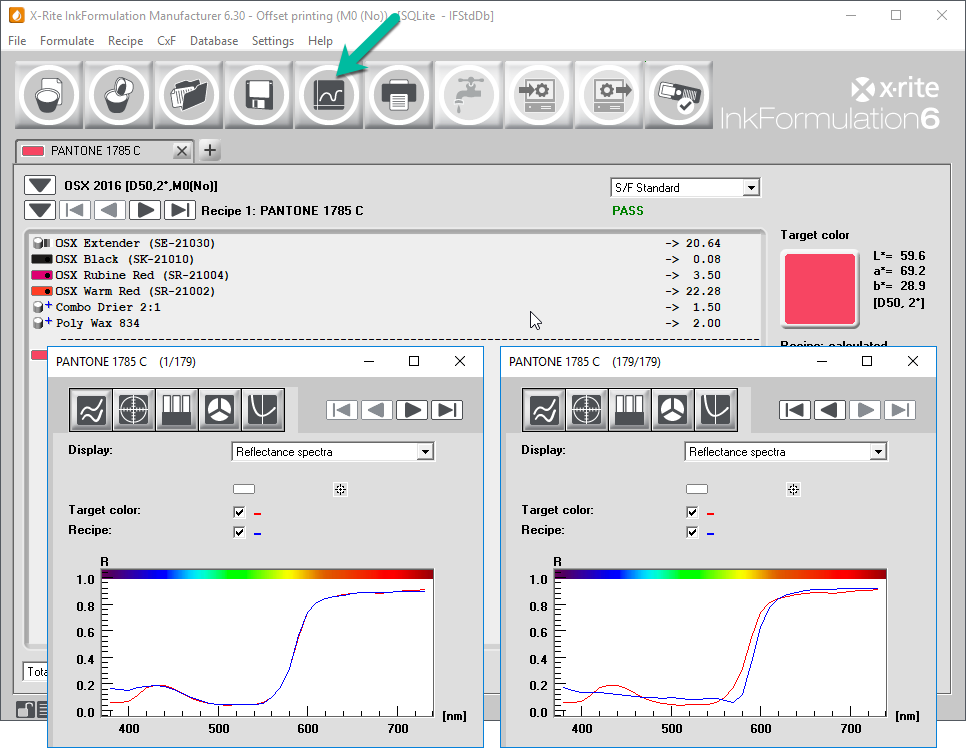
Matching curves Not matching curves
The picture (above) shows where to find the Spectra icon (green arrow) and what the spectra looks like when opened. The left curve was created from the formula on screen. The right curve was created from an incorrect Orange/Rubine mix.
The formula (same colorants) used for the curve on the the left will match to it’s target under any light source, the L*a*b* and visually. The formula (different colorants) used for the curve on the right which matches under a 5000K light will not match it’s target under other light sources. Colors that match under certain lights and not others is called metamerism.
If your customer just needs the color to match under 5000K lights then the match on the right would be ok, but that is almost never the case. A color match needs to match everywhere on earth.
3.5 Correction Recipe
If your original recipe needs to be corrected you can have Ink Formulation make the add for you. For a color add, it is best to correct from a measurement of your print at the same L value as your target. You can compare your color in Color Quality. Once you find a measurement at the same L value leave your spectro in place and toggle back to IF.
Note: The only time you wouldn’t want to correct a color from the same L value as your target is if your ink is too weak or too strong. In that case you want to correct the color by measuring your print at a proper, or desired ink film.

- Click on the Formulate -> Correction Recipe icon.
- Measure your sample print by clicking Measure or closing your eXact’s clamshell.
Put enough stock under your measurement to avoid influence from the background.

- Select colorants that you want to use as possible correction options.
The program will default to using colors that are in your current formula. You can add colors individually or choose a premade group.
- Click the >>.
This window shows the programmed sorting criteria. You can pick a formula from this screen.
- Click the >>.
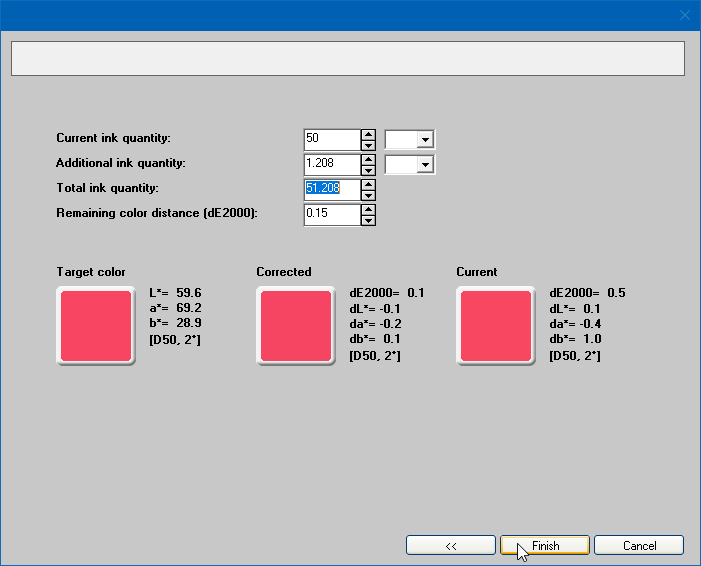
This window shows the difference between your current and corrected formulas.
- This is your add (circled).
Notice that the additive percentages will remain the same.
- Make your add and pull a test print. Re-read into Color Quality. If your ink still needs an add, repeat steps 1-7.
3.6 Swinging a Color on Press
The same rules apply when swinging a color on press as correcting a color match (section 3.5) on the bench. You need a target (e.g. master/previous press sheet, signed color proof, etc.) and a printed sample of the current color. Again, it is always best to compare color at equal L value or lightness unless adjusting for strength.
- Follow steps in section 3.3. Measure your target (e.g. proof, master press sheet, etc.) as described in section 3.3.
- Once you get to the main screen replace the formula with your current ink formula.
You do this by clicking on one of the colors on screen to open the Recipe Entry window. (see below)

- Fill the right box with the colorants of the ink on press.
Highlight the components you want to move and use the arrows in the middle to shift them. You can add (left to right) and/or remove (right to left) colorants. (see right)
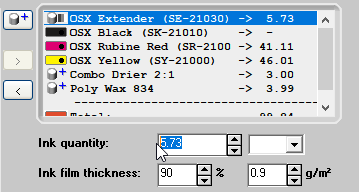
- Change the percentages to match your formula.
Highlight the component and then type in percentage below, within the Ink Quantity box. (see left)
- Once your 100% formula is entered, click OK.

- Change the formula amount to match how much ink you are swinging.
As you can see on my example I am swinging 14.27 lbs.
- Follow steps in section 3.5 and to get your correction.
3.7 Pantone®Live
PantoneLive houses all of Pantone’s digital standards in the cloud. Not only are the master standards there, but also the dependent standards. Because some master standards are not achievable on certain substrates, PantoneLive has created a set of dependent standards that are. They have a special naming system for the type of ink and substrate being used. Examples of the naming system can be seen at the bottom of the diagram below.
(Below) This shows how the PantoneLive standards work.

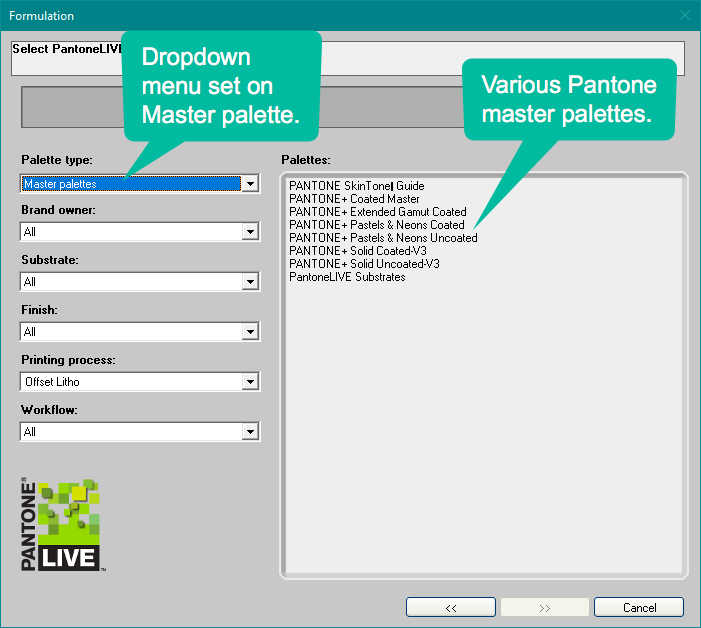
Access a Master Standard:
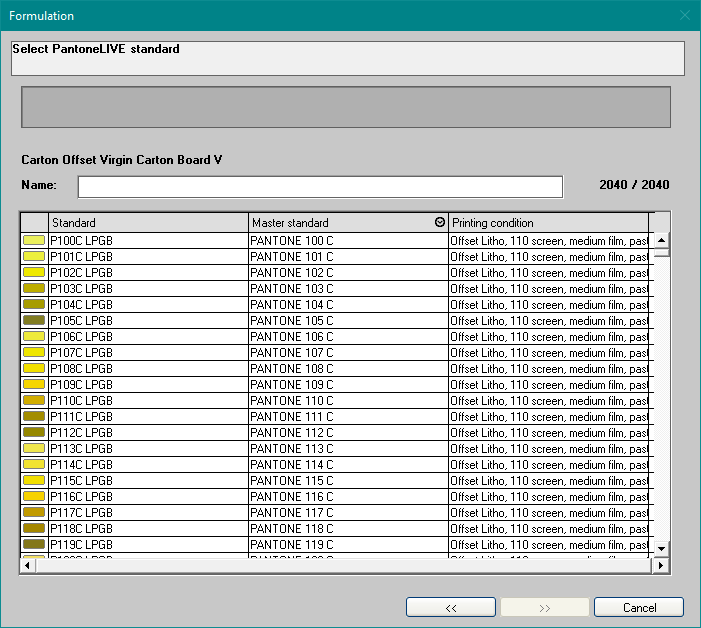
The Pantone Live screen in IF should look like this (right) to pull up a Master Standard.
- Choose one of the Palettes in the right box and click the >>.
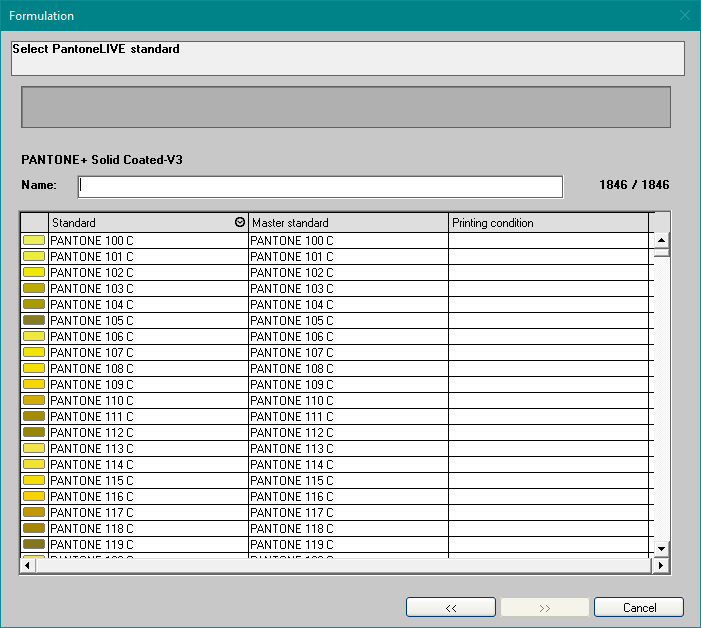
- This window (right) will open and you can choose the Pantone color you need.
You can also search for the color by entering Pantone number in the Name field.
- Click the >> and refer to step 6 in section 3.3 to continue a color match.
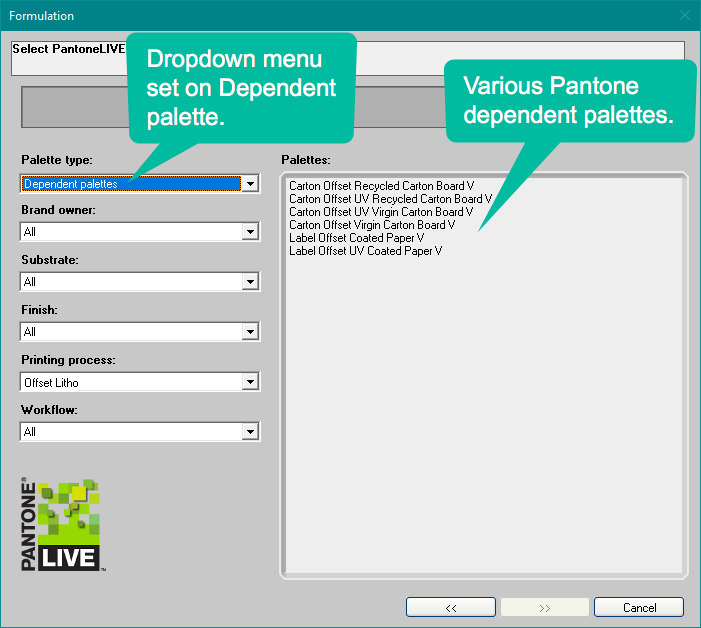
Access a Dependent Standard:
The Pantone® Live screen in IF should look like this (right) to pull up a Dependent Standard.
- Choose one of the Palettes in the right box and click the >>.
- This window (right) will open and you can choose the Pantone color you need.
You can also search for the color by entering Pantone number in the Name field.
- Click the >> and refer to step 6 in section 3.3 to continue a color match.
- Colornet
ColorNet® is the bridge between Color Quality and Ink Formulation. Colors saved in either program can be accessed within ColorNet. A customer (section 2.4), job (section 2.5), or standard (section 2.6) created in CQ can be opened in IF via ColorNet. Reversely, a recipe or target saved in IF can be accessed in CQ via ColorNet.
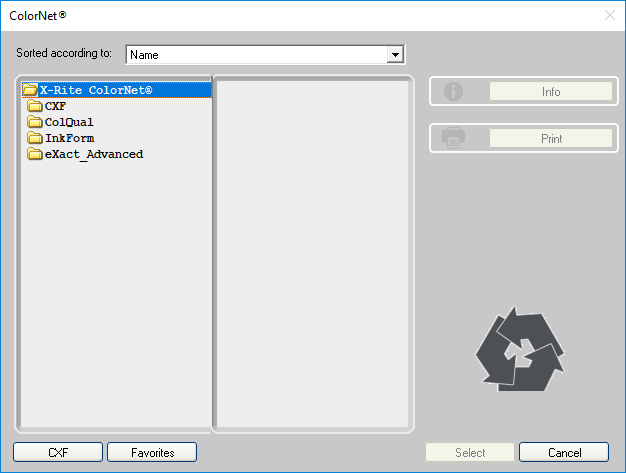
4.1 ColorNet® in Ink Formulation
You can access ColorNet in Ink Formulation when defining your standard during a basic recipe (section 3.3) or a correction recipe (section 3.5). (right)

This is an example in IF of accessing a job saved in CQ. (left)
In this example, we were looking for a color called Ink Systems Red, saved in CQ within the Jobs folder.
Notice the folder hierarchy (Colornet > ColQual > SQLite > Ink Systems > Jobs > Ink Systems Red).
4.2 ColorNet® in Color Quality
You can access ColorNet in Color Quality quick compare (section 2.3). (right)

You can also access ColorNet in CQ when creating a job (section 2.5) and defining the colors within. (right)

You can also access ColorNet in CQ when creating a standard (section 2.6). (right)
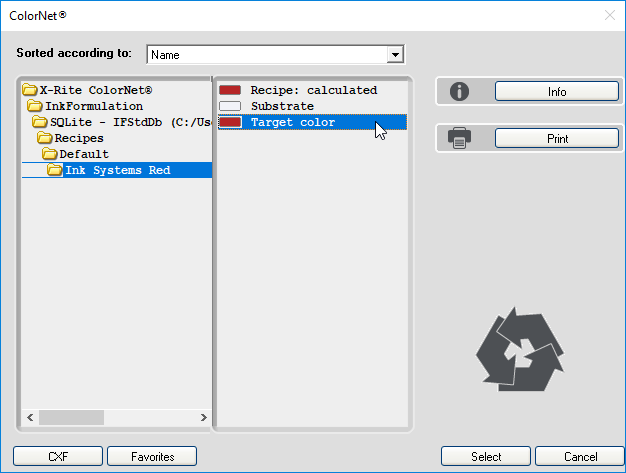
This is an example in CQ of accessing a recipe saved in IF. (left)
In this example, we were looking for a color called Ink Systems Red, saved in IF as a recipe.
Notice the folder hierarchy (Colornet > InkForm > SQLite > Recipes > Default > Ink Systems Red).